Had this genius idea today, which turned out to be a dumb one for the specific set of pictures I had in mind, "I want to show the pictures I took by the ruin of St. Paul by using google earth in my blog!"
The reason why it is a dumb idea is because the pictures were all taken around the same place, which is not suitable for the google earth or google earth plug-in interface. Too crowded.
Regardless, since I finally got it out, might as well share with you some lessons I learned embedded in the instructional guide below: lol
Creating a KML file
Granted, all ways lead to Rome and there are many ways to get the KML file that matched the image files to specific geographic locations. Since my pictures have already been uploaded to picasaweb, my KML file was created by simply clicking on the "View in Google Earth" link.

Because I had not give "meaningful" file names to each picture before they were uploaded, the file names were shown when mouse-over the little picture icons in google earth. Not very meaningful... The following pix showed you an example of what a bad file name looks like.... IMG_2693, IMG_2618...

A workaround for this problem, in this case, is to add captions to pictures to the picasaweb album and download the KML file again- since... ain't no nothing wrong adding captions to the pictures, I guess. 8-O lol
Once the KML files is downloaded, which should be to the "downloads" folder defined by your browser, open it up with google earth. Now you should be able to see the captions shown when mouseovering the images or pair-associated with the images.

Creating the KMZ file.
The next thing you have to do is to create the KMZ file by simply clicking on save->"Save Place As" inside of Google Earth. When the "Save As" window pops up, give it a meaningful filename and save it as a "KMZ" file. (By the way, KMZ file is the zipped format of KML file.)
Uploading your KMZ file.
I tried both google docs and google sites, maybe it is simply me stupid or simply didn't have the heart to play with it. They didn't work for me. (Let me know if you it out.) Ended up, I uploaded the file to another server somewhere else so that the file could be accessed on the Internet.
Getting the embed code created.
I used the "Embed KML Gadget" powered by google to get the embed code out. Please find following the screenshots for the Embed KML Gadget interface.
 One thing I need to remind you about this interface is that you have to put in the complete URL for the KMZ file in the textbox next to KML or My Maps URL. It would be something like "http://ratology.rt/ratprincess/Macau.kmz".
 Embeding the embed code into your blog.
Now that you get the script copied to the clipboard, switch to the HTML editor and paste the code in.

Voila! C'est ça! Bon chance!
Hope this help and hope your project suits this presentation better!
(P.S., If the google earth plug-in kept on loading and loading without showing anything-- can't quite be my fault since it works at times and stalls, other. 8-O lol)
The reason why it is a dumb idea is because the pictures were all taken around the same place, which is not suitable for the google earth or google earth plug-in interface. Too crowded.
Regardless, since I finally got it out, might as well share with you some lessons I learned embedded in the instructional guide below: lol
Creating a KML file
Granted, all ways lead to Rome and there are many ways to get the KML file that matched the image files to specific geographic locations. Since my pictures have already been uploaded to picasaweb, my KML file was created by simply clicking on the "View in Google Earth" link.
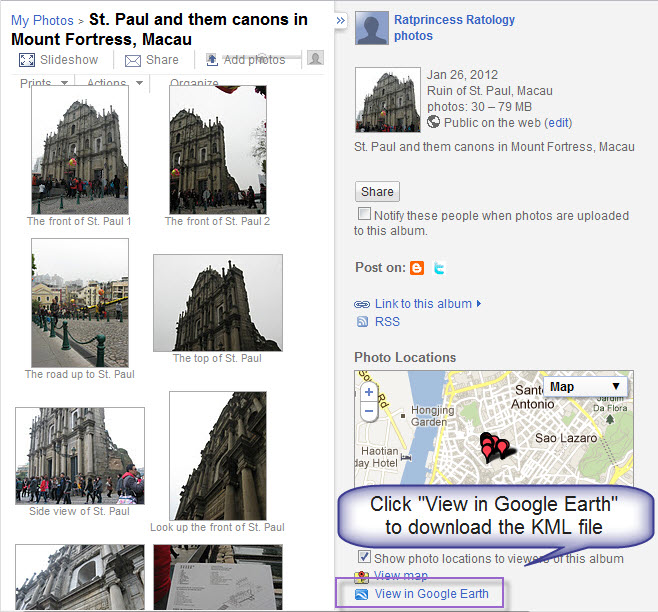
Because I had not give "meaningful" file names to each picture before they were uploaded, the file names were shown when mouse-over the little picture icons in google earth. Not very meaningful... The following pix showed you an example of what a bad file name looks like.... IMG_2693, IMG_2618...

A workaround for this problem, in this case, is to add captions to pictures to the picasaweb album and download the KML file again- since... ain't no nothing wrong adding captions to the pictures, I guess. 8-O lol
 |
| Add captions to your pictures and click on "Save Caption" |
 |
| After you have captions added to all pictures, click on "View in Google Earth" to download the KML file again. |

Creating the KMZ file.
The next thing you have to do is to create the KMZ file by simply clicking on save->"Save Place As" inside of Google Earth. When the "Save As" window pops up, give it a meaningful filename and save it as a "KMZ" file. (By the way, KMZ file is the zipped format of KML file.)
Uploading your KMZ file.
I tried both google docs and google sites, maybe it is simply me stupid or simply didn't have the heart to play with it. They didn't work for me. (Let me know if you it out.) Ended up, I uploaded the file to another server somewhere else so that the file could be accessed on the Internet.
Getting the embed code created.
I used the "Embed KML Gadget" powered by google to get the embed code out. Please find following the screenshots for the Embed KML Gadget interface.


Now that you get the script copied to the clipboard, switch to the HTML editor and paste the code in.

Voila! C'est ça! Bon chance!
Hope this help and hope your project suits this presentation better!
(P.S., If the google earth plug-in kept on loading and loading without showing anything-- can't quite be my fault since it works at times and stalls, other. 8-O lol)
No comments:
Post a Comment